Getting off the ground and back, Part I: Moon landing
Disclaimer: this is not final. If you find mistakes, please report them.
You are at the commands of a spaceship. You can control it in real time, and your task is to drive it from place to place.
But beware: fuel is limited, and on Earth air resistance may slow you down.
In this post series, we explore the mathematics of rocket science!
Preliminaries: Moon landing
Before tackling the hard problem of how to get away from the Earth, let’s tackle the simpler problem of safely landing on the Moon. The goal is to land safely, which means that our final velocity should be zero or close to it, and we want to use the least amount of fuel to do so.
It is simpler because the Moon has no atmosphere and therefore no drag, the only two forces competing are lunar gravity and our spacecraft’s thrust. But it’s not easy!
Before we dig into the physics and mathematics of this problem, have a go at it: try to land in 7 seconds with more than 380 kg of fuel left and a speed lower than 5 m/s. You are dropped 100 m above the surface with some initial speed. A very stupid autopilot can try to take care of landing for you.
Did you find yourself wasting time by trying to “gently” slow down? Or overshooting and erring aimlessly in space? Or running out of fuel earlier than expected? Or turning the thrusters on and off very often?
Let’s try to figure this out and look for an optimal solution.
Did you like this? Do you want to support this kind of stuff? Please share around. You can also buy me a coffee.
I. Equations of motion
Let us introduce some notations:
- \(m(t)\) is the spacecraft’s mass, which is changing over time (as we’re using fuel);
- \(y(t) > 0\) is the altitude with respect to the lunar surface;
- \(v(t)\) is the (vertical) velocity of the spacecraft;
- \(T(t)\) is the spacecraft’s thrust, a value between \(0\) and \(T_\text{max}\);
- \(k\) is the inverse of exhaust speed, which for our purpose is a constant relating thrust to mass of fuel used.
We’ll make the further simplifying assumptions that everything happens along a vertical line (we’re not moving left and right or rotating), and that we are close enough to the surface that the gravity force \(g\) is essentially constant. Applying Newton’s second law, we get the following equations of motion:
\[\begin{align*} \frac{\mathrm dy}{\mathrm dt}(t) & = v(t), & \frac{\mathrm dv}{\mathrm dt}(t) & = -g + \frac{T(t)}{m(t)}, & \frac{\mathrm dm}{\mathrm dt}(t) & = -k T(t). \end{align*}\]Observe that if we don’t use thrust at all, \(T = 0\), then the spacecraft is free-falling: its trajectory is independent of its mass, and we accelerate towards the Moon.
Note: we’re cheating a little here, because Newton’s law is not applicable to a varying-mass system. This is of no consequence, as in this case we are lucky and get the right equations. A proper derivation requires keeping track of the exhaust, see more details here and here.
II. Bang-bang
We mentioned above that \(T = 0\) corresponds to a free fall, which will inevitably send us crashing down. So we need to start pushing back at some point. How much thrust should we use?
Here is an intuitive argument, which can be mathematically backed up: we need a certain amount of energy to stop the spacecraft. The only way to produce this energy is by burning fuel – if we use less thrust, then we will have to thrust for longer, and we end up using the exact same amount of fuel. Bottom line: using less than maximum thrust brings no advantage here.
This means that our thrusters will either be completely off, or operating at full throttle. Arguably, we can leave the thrusters off until close enough, then turn them on to start our descent. This is known as a bang-bang control and is in fact, for this problem, the optimal control.
Our task is now much simplified: we merely have to determine under which conditions to start thrusting. We want to make sure that final velocity is zero and final altitude is zero and we want to use the least amount of fuel to do so.
III. Reaching the surface
Call the moment we start using maximum thrust \(t = 0\), until \(t = t_f > 0\). Therefore, \(\frac{\mathrm dm}{\mathrm dt}(t) = -k T_\text{max}\) which means that
\[m(t) = m(0) -kt T_\text{max}.\](assuming that we don’t deplete fuel completely at time \(t\), we’ll come back to this later on.) Recall that vertical acceleration is:
\[\frac{\mathrm dv}{\mathrm dt}(t) = -g + \frac{T_\text{max}}{m(t)}.\]We can already make an observation here: write \(m_f = m(t_f)\) the final mass of our vehicle after thrusting, if \(T_\text{max} < m_fg\) then our acceleration is always negative and we will crash no matter what. If \(T_\text{max} = m_f g\), then our acceleration is zero and we fly at constant velocity (presumably towards the lunar surface). To have a chance to avoid crashing, we therefore need \(T_\text{max} > m_f g\).
Note: physically, this means that the force of thrust is stronger than the force of gravity, at least in the case where gravity is the weakest (because the spacecraft is the lightest).
To get our spacecraft’s altitude as a function of time, we need to integrate this twice. Let’s start with velocity first:
\[\begin{align*} v(t) - v(0) & = -gt + \int_{u = 0}^{t} \frac{T_\text{max}}{m(u)}\,\mathrm du = -gt + \int_{u = 0}^{t} \frac{T_\text{max}}{m(0) - u k T_\text{max}}\,\mathrm du \\ & = -gt + \frac{1}{k}\int_{u = 0}^{t} \frac{1}{m(0)/kT_\text{max} - u }\,\mathrm du \\ & = -gt - \frac{1}{k} \ln\left( 1 - \frac{t k T_\text{max}}{m(0)} \right) \\ & = -gt - \frac{1}{k} \ln \frac{m(t)}{m(0)} \end{align*}\]Since by assumption, \(v(t_f) = 0\), we can rewrite velocity for \(t \leq t_f\) as
\[v(t) = g(t_f - t) - \frac1k \ln \frac{m(t)}{m_f}.\]Now another (somewhat harder) integration will yield position, using the fact that \(y(t_f) = 0\):
\[y(t) = \frac{t - t_f}{k} - \frac{g(t_f - t)^2}{2} + \frac{m(t)}{k^2 T_\text{max}} \ln \frac{m(t)}{m_f}.\]Exercise: obtain the above formula on your own.
IV. What about the fuel?
Let’s go back to discuss fuel now, and make two important observations.
The first observation is that our spacecraft’s mass cannot be negative: at some point we have exhausted all our fuel and only the mass of the cabin, motors etc. remain. Let \(m_\text{min}\) be the mass of the spacecraft when there is no fuel left. Thus for \(0 < t \leq t_f\) we have
\[m_\text{min} \leq m(t) \leq m(0).\]This means that \(m(0) - t_f k T_\text{max} \geq m_\text{min}\) and therefore
\[t_f \leq \frac{m(0) - m_\text{min}}{k T_\text{max}} = t_\text{max}.\]If we haven’t reached the surface by \(t_\text{max}\), we are going back to free fall, and we most likely will crash.
The second observation is that using the least amount of fuel is equivalent to keeping the thrusters on as shortly as possible (since we are thrusting at full power anyway), and therefore we are looking for \(t_f\) as small as possible.
We now know the trajectory of our spacecraft in the two extreme cases: when \(T = 0\) and when \(T = T_\text{max}\). It remains to figure out when to switch the thrusters on!
V. Phase plane and switching time
The state of our spacecraft is determined by its position, velocity and mass. However, in “free fall” mode the mass is unchanging, and in “full thrust” mode the mass is related to position and velocity in a unique way. Therefores, \((v(t), y(t))\) gives everything we need to know about the spacecraft at any time \(t\).
The plane \((v, y)\) is called the phase space of our spacecraft.
During free fall (\(T = 0\)), we have
\[\begin{align*} v(t) & = v(0) - gt \\ y(t) & = y(0) - v(0)t - \frac12 gt^2 \end{align*}\]We can look as some of the trajectories in phase space (picking \(g = 1.62\,\text{m.s}^{-2}\) as the Moon’s surface gravity):

Each line corresponds to a portion of a trajectory with some initial upwards velocity \(v(0) = 10\,\text{m.s}^{-1}\), starting from around 100 m. The trajectories are followed from right to left. Here’s the SageMath script that generates this plot:
g  = 1.62   # Surface gravity
v0 = 10     # Initial velocity
plots = []  # Collection of plots

t = var('t')

for i in range(10):
    y0 = 95 + i     # Initial position around 100 m

    v = lambda t: v0 - g * t                    # v(t)
    y = lambda t: y0 + v0 * t - g * t^2 / 2.0   # y(t)

    maxt = find_root(y(t), 0, 10)               # Time we hit the surface

    p = parametric_plot(
        (v(t), y(t)),                           # Plot (v(t), y(t))
        (t, 0, maxt),                           # for t = 0, ..., maxt
        aspect_ratio = 0.125,                   # Optional
        color = hue(i / 50 + 0.5),              # Optional
        figsize = 8                             # Optional
    )
    plots.append( p )

show(sum(plots))    # Collect all plots in one figure
Now turn our attention to the “full thrust” trajectories. We recall here the equations from above:
\[\begin{align*} v(t) & = g(t_f - t) - \frac1k \ln \frac{m(t)}{m_f} \\ y(t) & = \frac{t - t_f}{k} - \frac{g(t_f - t)^2}{2} + \frac{m(t)}{k^2 T_\text{max}} \ln \frac{m(t)}{m_f} \end{align*}\]The corresponding trajectory in phase space has the following shape \(\Gamma\), which we follow from left to right. Note that \(\Gamma\) really ends, the curve doesn’t go any further to the left:

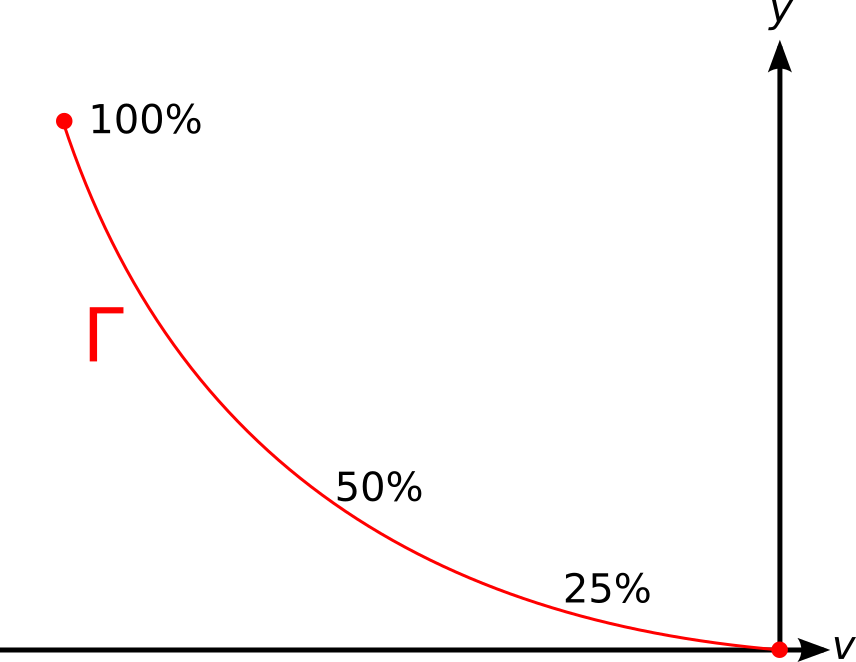
On the simplified diagram we have indicated how much of the remaining fuel is burnt, depending on where we start our descent on \(\Gamma\). Note that we cannot use more than 100% of the fuel, so \(\Gamma\) really is a curved segment.
And here’s the code:
t    = var('t') # Time
k    = 1/200    # Inverse of exhaust speed
m0   = 1500     # Initial total mass
mmin = 1000     # Final (empty) mass
g    = 1.62     # Surface gravity

descents = []

for i in range(10):
    Tmax = 20000 - 1000 + 200 * i   # Thrust, around the nominal value of 20kN

    m = lambda t: m0 - k * Tmax * t # Mass at time t

    tf = (m0 - mmin)/(k * Tmax)
    vt = lambda t: (g * (tf - t) - ln( m(t) / m(tf) ) / k)
    yt = lambda t: ((t - tf)/k - g*(tmax - t)^2/2 + m(t)/(k^2 * Tmax) * ln(m(t)/m(tf)))

    p = parametric_plot(
        (vt(t), yt(t)),             # Plot (v(t), y(t))
        (t, 0, tf),                 # for t = 0, ..., tf
        aspect_ratio = 0.25,        # Optional
        color = hue(i/100),         # Optional
        figsize = 8                 # Optional
    )

    descents.append(p)

show(sum(descents))     # Collect all plots in one figure
We can now solve our landing problem in a purely geometric manner, namely: see whether our freefall trajectory intersects \(\Gamma\), and when it does, turn the thrusters to full power.
(If our freefall trajectory does not intersect \(\Gamma\), we will crash whatever we do, we may as well try to lessen the blow by thrusting anyway.)
Let’s see that in action by putting on top of another our graph for freefall descent (blue) and optimal descent (red):

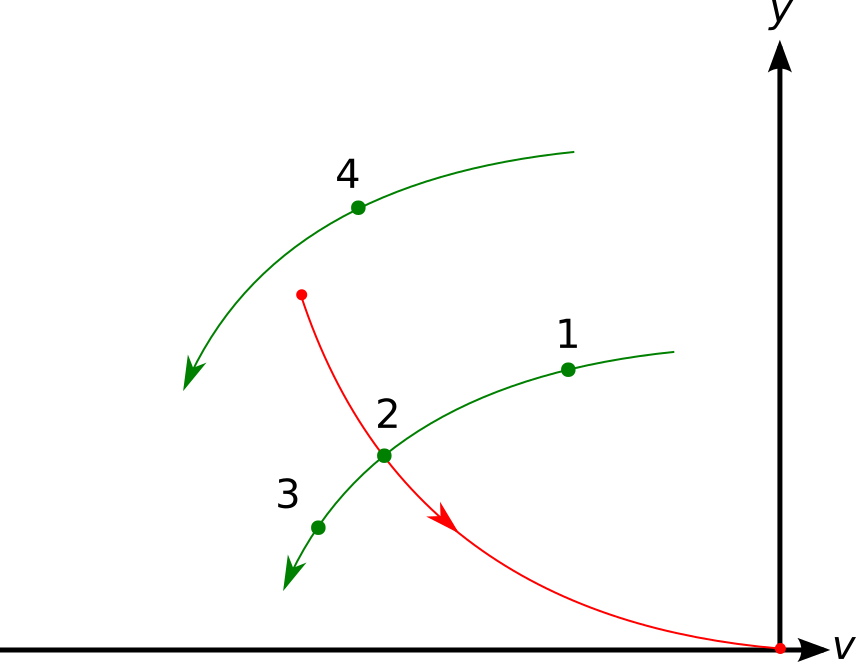
We can make the following observations:
- Spacecraft in position 1 is on a trajectory that will cross \(\Gamma\). Therefore they can land safely. They just have to wait until they reach \(\Gamma\) and then activate full thrust until landing.
- Spacecraft in position 2 is just in the right spot, they need to thrust now.
- Spacecraft in position 3 missed their chance: they are now going too fast at an altitude too low for their thrusters, even at full power, to prevent the crash.
- Spacecraft in position 4 will never cross \(\Gamma\): there isn’t enough fuel in the spacecraft for them to make a safe descent.
Exercise: there are initial freefall conditions that hit \(\Gamma\) at the very tip (i.e., we will use all available fuel and make a safe descent; but barely). Any faster or higher than that and we will crash. Can you determine their values?
Bottom line, we can look for a graphical solution where the blue and the red curve intersect to figure out the best moment to activate thrusters. That is exactly what the autopilot does in our example, with some tolerance for impact.
Takeaways
Here’s the important things we got from working out this example:
- When it is physically possible, we can find an optimal strategy to land safely on the Moon;
- This strategy involves turning the thrusters on at maximum power at the appropriate time (bang-bang control);
- Determining the “appropriate time for thrusting” is a yes/no question that depends on current speed, altitude, fuel level and spacecraft parameters (mass, maximum thrust etc.): this can be implemented as part of the spacecraft design;
- Sometimes, it is not physically possible to safely land (e.g., we are going too fast for our thrusters to avoid crashing);
- The phase space is a natural setting to study this all.
With that in mind, deriving the exact formulas (for position, speed etc.) is somewhat tedious.
(And you may still want to pad your lander with many pillows in case the lunar surface isn’t perfectly flat… we made several simplifying assumptions.)
In the next post we’ll look into how we can find optimal controls in a more efficient and generic way.
Bonus (‘Hardcore mode’): the Moon landing problem is a staple of engineering, and there are many variations still to be studied. What if we have initial lateral velocity and need to use fuel to reduce it too? What if we can’t max out thrusters immediately (e.g., there is a 1 second delay)? WHat if we don’t know our exact position and velocity? What if we need enough fuel to get off the Moon afterwards? What if the gravity gradient causes the lander to rotate?